
Introduction
The deltaDNA SDK for iOS allows your native iOS games to send information on in-game events and player actions to deltaDNA.
Events are sent to the deltaDNA platform as JSON objects, these events are managed and tracked using the online dashboard.
When your game triggers events the SDK will store them locally and upload them at regular intervals when a connection is available, or at a time of your choosing. This allows the SDK to collect events regardless of connectivity and gives you control over the timing and frequency of uploads.
Events vary in complexity, but are all derived from a common event schema. This document and the accompanying example application provide examples of a variety of events.
The source code for the SDK, written in Objective-C, is provided as a zipped Xcode project.
Download deltaDNA_iOS_SDK_v3_2 Version 3.2 of the iOS SDK supports numerous improvements to simplify and automate many integration and event creation tasks. Some code re-factoring will be required if you are upgrading from a previous version.
Importing the SDK
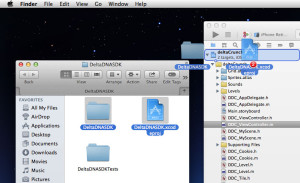
After downloading and unzipping the iOS SDK you need to import it in to your game.
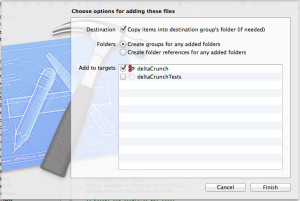
Locate the deltaDNA SDK Xcode project file and SDK source code folder in Finder and drag and drop them on to your project in Xcode.
Make sure you select the option to copy the files in to your project folders.
Starting the SDK
The SDK needs to be started before you can send events from your game.
Add the following import statements.
|
1 |
#import "DDNASDK.h" |
Click the Project -> Build Phases Tab -> Compile Sources Section -> Double Click on the file name
Then add -fobjc-arc to the popup window.
Startup Parameters
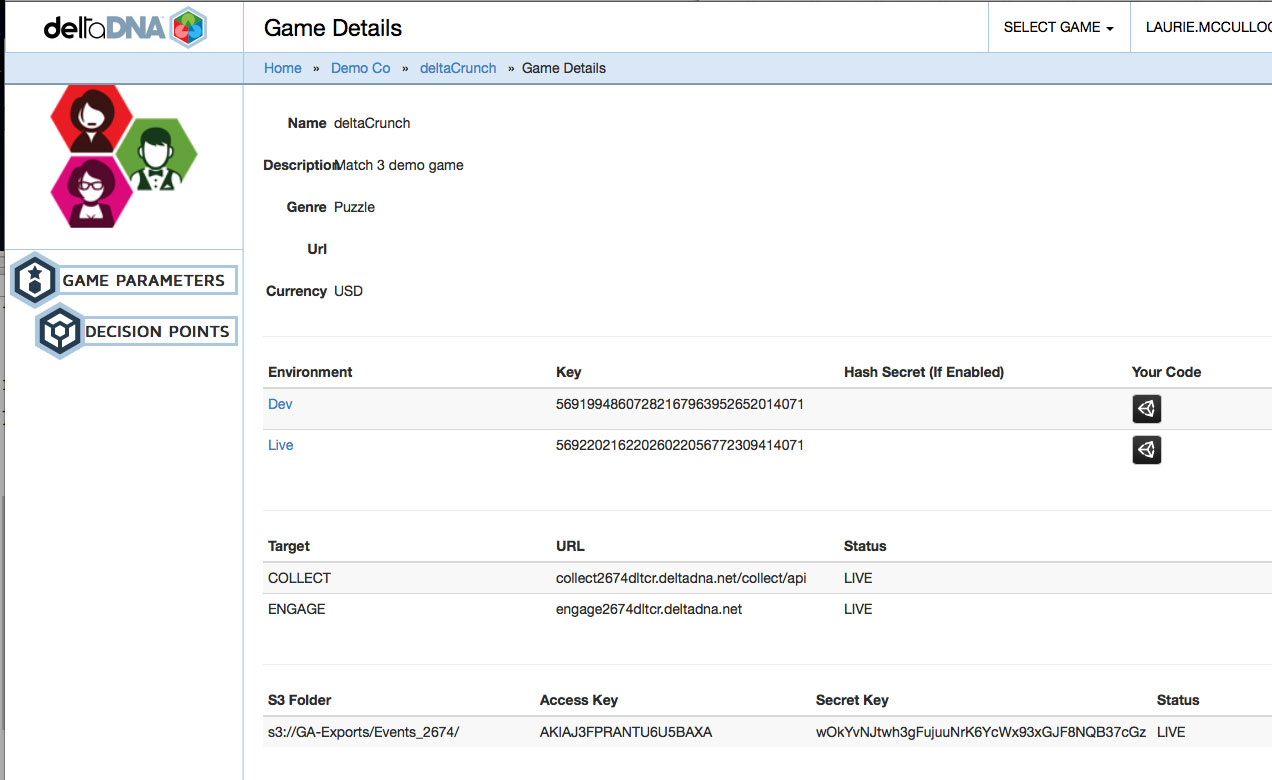
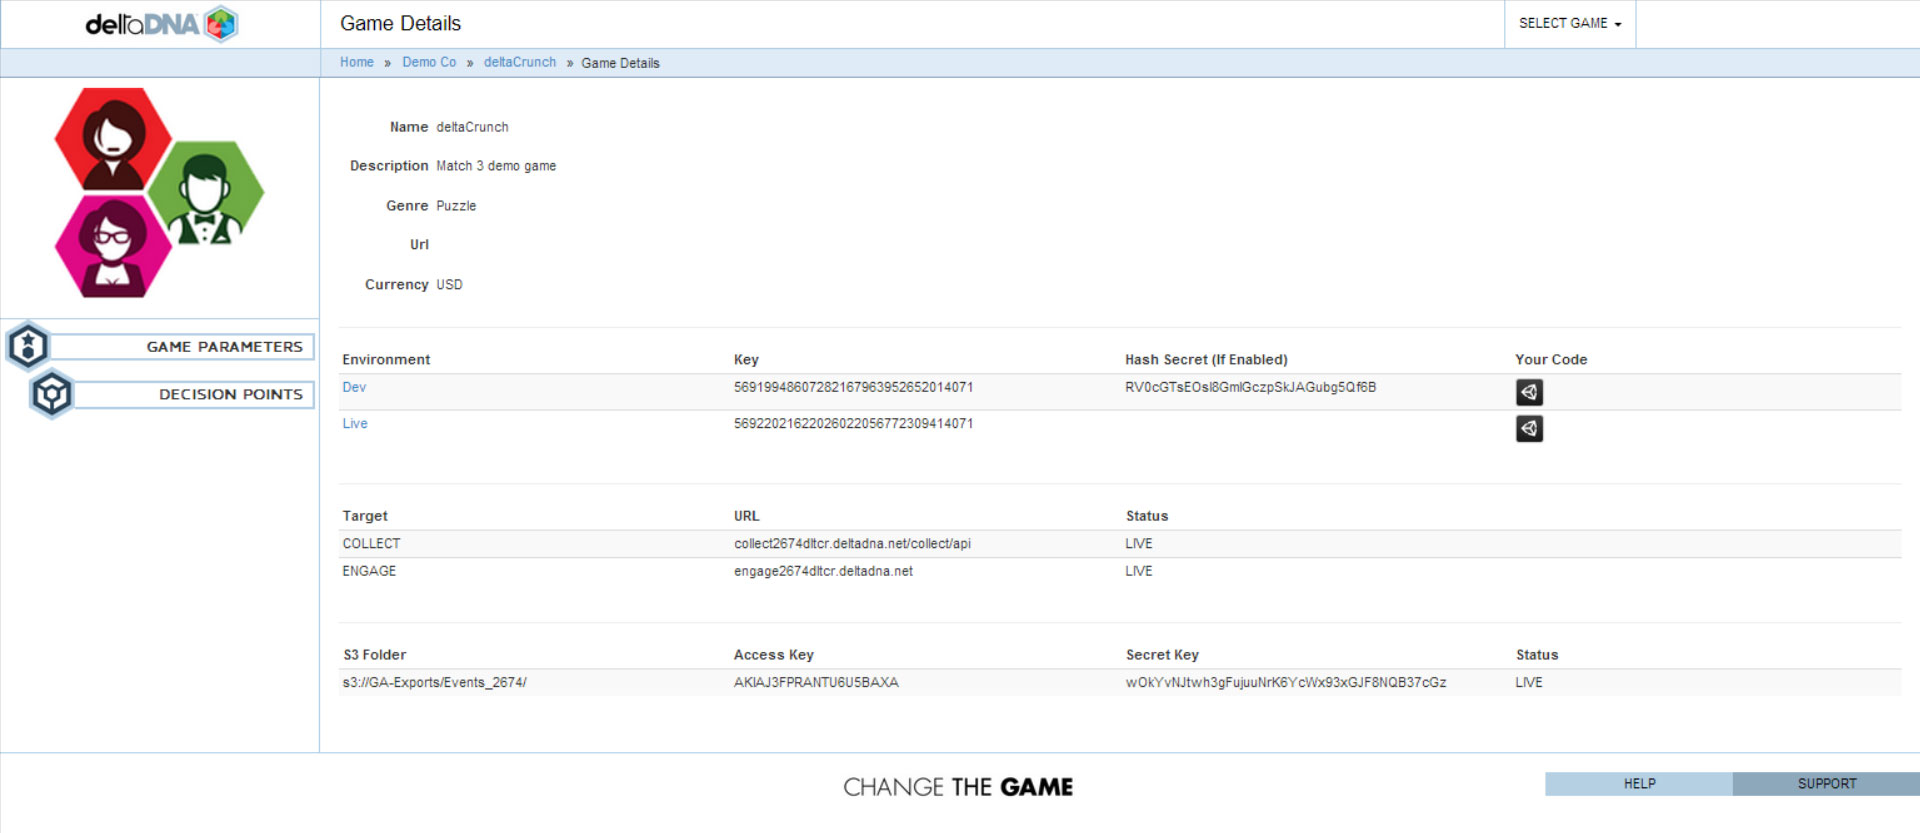
You will need to supply at least three parameters to when you start the SDK. These parameters can be found on your “Game Details” page.
- environmentKey : This is a unique 32 character string assigned to your application. You will be assigned separate application keys for development and production builds of your game.
- collectURL : This is the address of the server that will be collecting your events.
- engageURL : This is the address of the server that will provide real-time A/B Testing and Targeting. This is only required if your game uses these features.
- userID (optional) : Every user needs to have a unique userID. If your game can provide a unique userID you can use it. Alternatively, the platform will generate a unique User Id if none is provided and use it for all subsequent events. To generate a unique userID,just leave out the withUserID parameter the first time the SDK is started
These parameters above can be found on your game details page. Please note, there are different environmentKey parameters for your DEV & LIVE environments, you will need to change the environment key that you start the SDK with as you move from development and testing to production.
|
1 2 3 4 5 6 7 8 |
// Grab a handle to the singleton. DDNASDK *sdk = DDNASDK.sharedInstance; // Start the SDK. [sdk startWithEnvironmentKey:@"<Your Environment Key>" collectURL:@"http://<Your Collect URL>" engageURL:@"http://<Your Engage URL>" userID:@"<Your User ID>"]; |
This is the minimum amount of code required to start the iOS SDK and send events. It will automatically send the newPlayer event the first time the SDK is run and the gameStarted and clientDevice event each time the game runs. Read on to find out how to go beyond recording a few automated events and start unlocking the power of deltaDNA with additional events, parameters, your own custom events, A/B tests and targeted campaigns.
Anatomy of an event
All events are recorded as JSON documents with a shared basic schema . The document will be different for every event type, but all of them should adhere to the following minimal schema:
|
1 2 3 4 5 6 7 8 9 10 |
{ "eventName": "gameEnded", "userID": "a2e92bdd-f59d-498f-9385-2ae6ada432e3", "sessionID": "0bc56224-8939-4639-b5ba-197f84dad4f4", "eventTimestamp": "2014-07-04 11:09:42.491", "eventParams": { "sdkVersion": "iOS SDK v3.1", "platform": "IOS_MOBILE" } } |
The iOS SDK will automatically populate the userID, sessionID, eventTimestamp , platform & sdkVersion parameters for every event you send. When you add parameters to an event they will all be placed inside the eventParams object.
The order of the parameters in your JSON event doesn’t matter.
You can inspect the parameters that each event expects, their type and any formatting or enumeration rules in the Event Manager.
Parameters can be either Optional or Required. Any parameters that are are optional don’t have to be included in your event if you don’t have a valid value to put in them. It is better to leave them out completely, than set their value to null or empty.
This basic event structure provides great flexibility for recording events with varying levels of complexity, from simple events like the one above to complex events containing nested arrays. The following code examples will show a variety of events from simple to complex.
Please note that all events are validated and will be rejected if they don’t match the schema in the Event Manager.
Settings
The simple startup code above, is the minimum code required to start collecting analytics data from your players. You will quickly want to start adding more events and fine tuning your implementation. Be sure to check further down this page for a full list of settings, methods and helpers. In the meantime, here are a couple of useful things that you should do before the call to start.
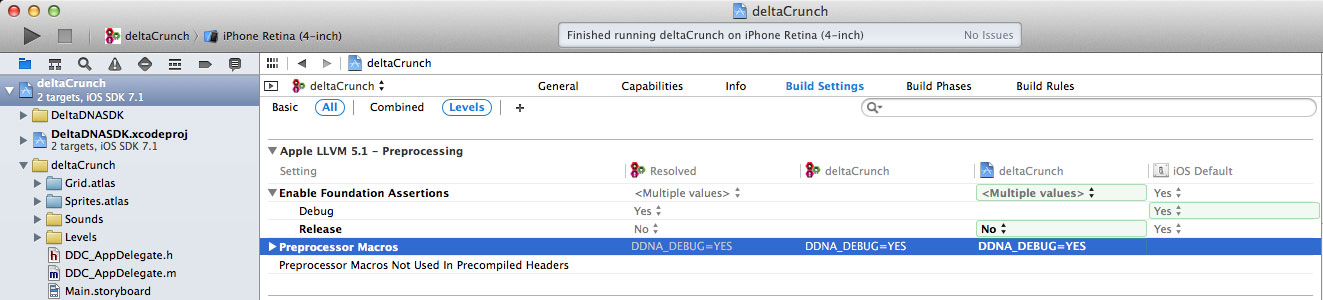
- Tell the SDK to output detailed debug on the events you are collecting and communications with deltaDNA. This is particularly useful when used in conjunction with the “QA – Interactive Validator” during development, as it will help you resolve any issues that are causing any of your events to fail validation. Turn on debugging by adding DDNA_DEBUG=YES to your Build Settings >> Preprocessor Macros
- Set the clientVersion of your game. This is advisable and can very useful for identifying behavioural differences between players on different builds of your game. Especially when a client version update is an option that many mobile users don’t bother with.
12// Set game client version information.sdk.clientVersion = @"1.0";
There are many other useful settings described later that will help you with push notification messages, device IDs, event hashing, automated event collection and automated communications, be sure to check them out.
Example 1 – A simple event.
The start up code that we have seen already will send the newPlayer, clientDevice and gameStarted events to deltaDNA automatically. In the following code we will add an event ourselves in code.
When we added our game to deltaDNA seven events were automatically added, these events tend to be standard across all games and are used to drive many of the dashboards. For now we will just use one of those standard events.
|
1 2 3 4 5 6 |
NSMutableDictionary * eventParams = [NSMutableDictionary dictionary]; [eventParams setValue:@"Music" forKey:@"option"]; [eventParams setValue:@"Disabled" forKey:@"action"]; [sdk recordEvent:@"options" withEventDictionary:eventParams]; |
The following JSON event would be uploaded
|
1 2 3 4 5 6 7 8 9 10 11 12 |
{ "eventTimestamp": "2014-08-05 16:22:53.367", "sessionID": "9CFAA82F-02A1-4E1D-84DB-FD91D314931E", "userID": "AC247871-C6CD-4598-9287-3E29A51C65A6", "eventName": "options", "eventParams": { "action": "Disabled", "option": "Music", "sdkVersion": "iOS SDK v3.1", "platform": "IOS_MOBILE" } } |
Instead of creating our event parameters as a dictionary, we could have used a deltaDNA EventBuilder helper object.
|
1 2 3 4 5 6 |
DDNAEventBuilder *eventParams = [[DDNAEventBuilder alloc]init]; [eventParams setString:@"Music" forKey:@"option"]; [eventParams setString:@"Disabled" forKey:@"action"]; [sdk recordEvent:@"options" withEventBuilder:eventParams]; |
Using an EventBuilder helper doesn’t make much difference in this example, but we’ll see some more useful helper examples in the following more detailed events.
Example 2 – Adding a new template event
The previous example used one of our seven standard events, this time we will do something a bit more ambitious, we will add an event to our schema from the predefined list of template events, add an additional custom parameter then trigger the event from our code.
Add a missionStarted event to your event schema from the event template list, then add a new missionDifficulty parameter of type STRING.
The code to trigger the missonStarted event using an NSMutableDictionary.
|
1 2 3 4 5 6 7 8 9 |
NSMutableDictionary * eventParams = [NSMutableDictionary dictionary]; [eventParams setValue:@"Mission 01" forKey:@"missionName"]; [eventParams setValue:@"M001" forKey:@"missionID"]; [eventParams setValue:false forKey:@"isTutorial"]; [eventParams setValue:@"EASY" forKey:@"missionDifficulty"]; [sdk recordEvent:@"missionStarted" withEventDictionary: eventParams]; |
or alternatively using a deltaDNA EventBuilder
|
1 2 3 4 5 6 7 8 9 |
DDNAEventBuilder * eventParams = [[DDNAEventBuilder alloc ]init]; [eventParams setString:@"Mission 01" forKey:@"missionName"]; [eventParams setString:@"M001" forKey:@"missionID"]; [eventParams setBoolean:NO forKey:@"isTutorial"]; [eventParams setString:@"EASY" forKey:@"missionDifficulty"]; [sdk recordEvent:@"missionStarted" withEventBuilder: eventParams]; |
The following JSON event would be uploaded
|
1 2 3 4 5 6 7 8 9 10 11 12 13 |
{ "eventTimestamp": "2014-08-05 17:19:27.774", "sessionID": "B407BB1F-2FFB-4935-82AB-AA2D47FCA8AF", "userID": "AC247871-C6CD-4598-9287-3E29A51C65A6", "eventName": "missionStarted", "eventParams": { "sdkVersion": "iOS SDK v3.1", "missionDifficulty": "EASY", "missionName": "Mission 01", "missionID": "M001", "platform": "IOS_MOBILE" } } |
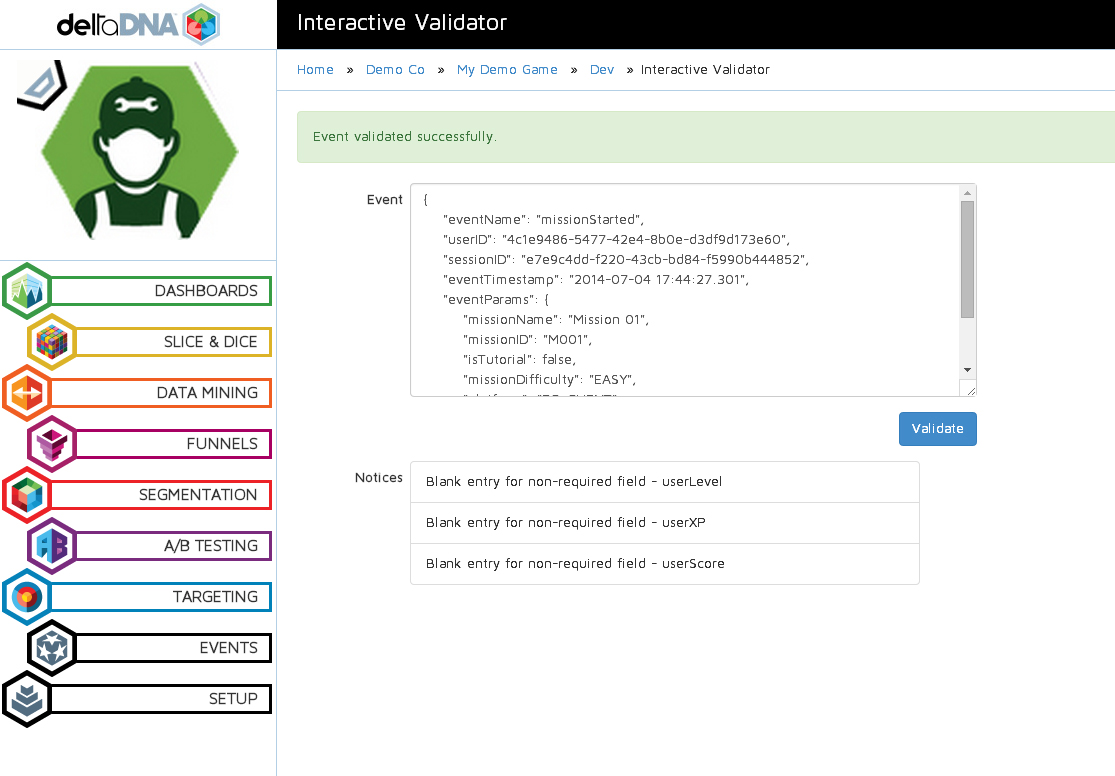
Pasting an event JSON into the Interactive Validator in the EVENTS menu can help resolve errors, our missionStarted event passed validation first time.
Example 3 – A complex event
The previous examples have been pretty straightforward and haven’t required much explanation. However, the following one is a bit more complex as it introduces nesting, arrays and some special objects that you will encounter when the player buys, trades, wins, exchanges currency and items with the game or other players. The good news is, the structure for this is fairly standard and the following event is as complex as it gets.
We are going to trigger a transaction event that records the player using some real world currency to purchase to purchase a treasure chest containing some virtual currency and multiple items. We will also take advantage of deltaDNA revenue validation with the Apple store to check that the transaction is valid.
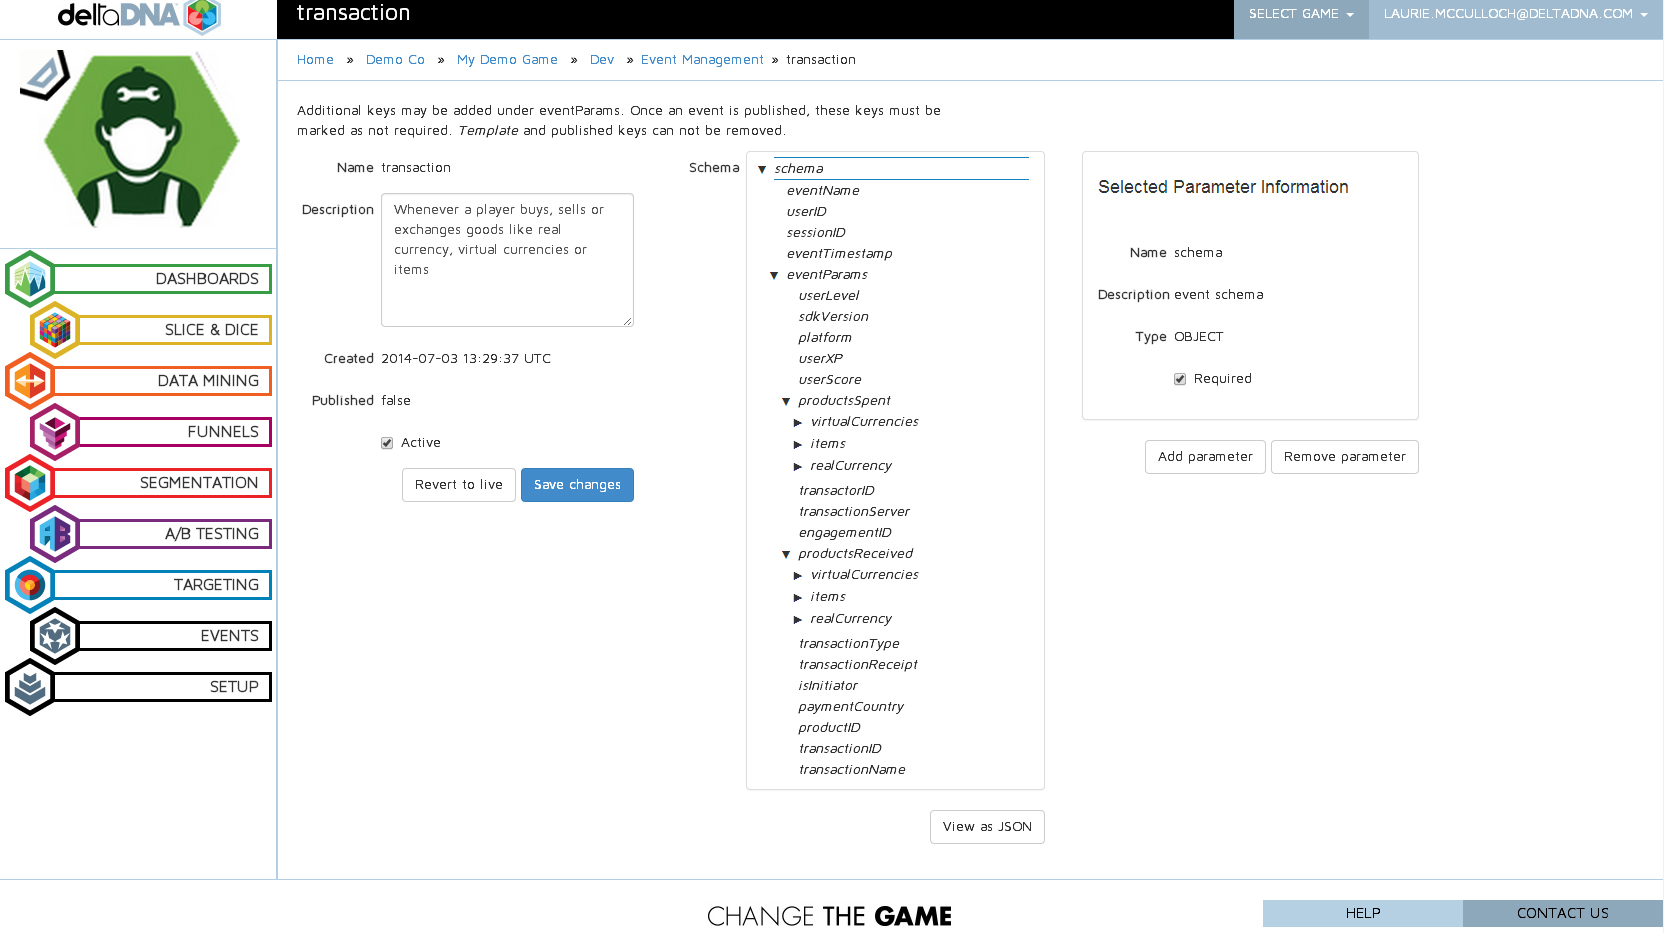
As you can see the structure of the transaction event is a bit more complex. It contains a couple of Product objects for recording productsSpent and productsReceived.
Our JSON event will end up looking like
|
1 2 3 4 5 6 7 8 9 10 11 12 13 14 15 16 17 18 19 20 21 22 23 24 25 26 27 28 29 30 |
{ "eventName": "transaction", "userID": "EFAB4AA5-76D4-4A2F-BDB0-6142401AD0F6", "sessionID": "B6D54658-FE3F-490B-8DF5-60A29FEAF285", "eventTimestamp": "2014-08-08 20:24:49.433", "eventParams": { "transactionType": "PURCHASE", "productsSpent": { "realCurrency": { "realCurrencyType": "USD", "realCurrencyAmount": 499 } }, "transactionName": "Buy Gold Coins", "productsReceived": { "virtualCurrencies": [ { "virtualCurrency": { "virtualCurrencyName": "Gold", "virtualCurrencyType": "PREMIUM", "virtualCurrencyAmount": 500 } } ] }, "transactionReceipt": "ewok9Ja81............991KS==", "platform": "IOS_MOBILE", "sdkVersion": "iOS SDK v3.1" } } |
and the following code was is required to create it.
|
1 2 3 4 5 6 7 8 9 10 11 |
//----------------------------------------------------------------- // Buy some virtual currency using a transaction event, // built with a buyVirtualCurrency transaction helper. [sdk buyVirtualCurrency:@"PREMIUM" receivingAmount:500 withName:@"Gold" usingRealCurrency:@"USD" spendingAmount:499 withTransactionName:@"Buy Gold Coins" andTransactionReceipt:@"ewok9Ja81............991KS=="]; |
The transaction event above was created using a helper method. If you are using the buyVirtualCurrency helper method you will need to add the following header to your code.
|
1 |
#import "DDNASDK+Transaction.h" |
It is also worth noting that the currency value is always sent as an integer in the minor currency unit and the realCurrencyType is an ISO-4217, 3 character currency code.
|
1 2 3 4 |
"realCurrency": { "realCurrencyType": "USD", "realCurrencyAmount": 499 } |
The above snippet is $4.99 USD.
It is also possible to create transactions using an event builder object.
|
1 2 3 4 5 6 7 8 9 10 11 12 13 14 15 |
// A transaction event using an EventBuilder object. DDNAEventBuilder * transactionParams = [[DDNAEventBuilder alloc] init]; [transactionParams setString:@"Weapon Purchase" forKey:@"transactionName"]; [transactionParams setString:@"PURCHASE" forKey:@"transactionType"]; DDNAProductBuilder * productsReceivedParams = [[DDNAProductBuilder alloc] init]; [productsReceivedParams addItem:@"Weapon" withAmount:1 andName:@"Mighty Steel Sword"]; [transactionParams setProductBuilder:productsReceivedParams forKey:@"productsReceived"]; DDNAProductBuilder * productsSpentParams = [[DDNAProductBuilder alloc] init]; [productsSpentParams addVirtualCurrency:@"PREMIUM" withAmount:1250 andName:@"gold"]; [transactionParams setProductBuilder:productsSpentParams forKey:@"productsSpent"]; [sdk recordEvent:@"transaction" withEventBuilder:transactionParams]; |
Would generate the following event.
|
1 2 3 4 5 6 7 8 9 10 11 12 13 14 15 16 17 18 19 20 21 22 23 24 25 26 27 28 29 30 31 32 33 34 |
{ "eventTimestamp": "2014-08-10 11:12:17.367", "sessionID": "3EB86898-5FFC-4BB2-BBAB-08FF03D6AA61", "userID": "AC247871-C6CD-4598-9287-3E29A51C65A6", "eventName": "transaction", "eventParams": { "transactionType": "PURCHASE", "platform": "IOS_MOBILE", "sdkVersion": "iOS SDK v3.1", "transactionName": "Weapon Purchase", "productsReceived": { "items": [ { "item": { "itemType": "Weapon", "itemAmount": 1, "itemName": "Mighty Steel Sword" } } ] }, "productsSpent": { "virtualCurrencies": [ { "virtualCurrency": { "virtualCurrencyAmount": 1250, "virtualCurrencyName": "gold", "virtualCurrencyType": "PREMIUM" } } ] } } } |
This event may be more complex but the structure is logical, flexible and provides a mechanism for players spending or receiving any combination of currencies and items.
Transaction Validation
The platform can undertake transaction receipt validation with the Apple Store in order to ensure that any revenue displayed in your dashboards is genuine revenue and not the result of a hacked game or Jail broken device.
If you wish to use transaction validation you will need to configure some store specific store parameters on your Game Details page in deltaDNA platform, e.g. for Apple you would set your Apple GameStoreID. You also need to send two parameters along with each transaction event to tell deltaDNA that the transaction should be validated.
e.g. To validate an Apple store IAP
|
1 2 |
"transactionServer": "APPLE", "transactionReceipt": "ewok9Ja81............991KS==", |
NB: The transactionServer parameter is added automatically for you if you are using the transaction helper.
Example 4 – Engage
Games can retrieve time sensitive information from Engage to determine if a particular action should be taken for the user at a specific time, based on A/B Test results or Targeting. Essentially your game should make engage requests at predetermined decision points in your game and the response will allow you to personalise the gameplay for that user instantly.
The following example shows how you can use Engage targeting to change an IAP offer made to the player :
A targeted campaign would be setup on the deltaDNA platform to target specific users and inform the game of any parameters that should be modified or messages that should be presented.
The game can then:
- Make an Engage request
- And react to the response in a callback.
The code to make the Engage request looks like
|
1 2 3 4 5 6 7 8 9 10 |
NSMutableDictionary * engageParams = [NSMutableDictionary dictionary]; [engageParams setObject:[NSNumber numberWithInt:4] forKey:@"userLevel"]; [engageParams setObject:@"Disco Volante" forKey:@"missionName"]; [sdk requestEngagement:@"outOfCredits" withEngageParams:engageParams callbackBlock:^(NSDictionary * response) { NSLog(@"Engage returned '%@'.", [NSString stringWithContentsOfDictionary:response]); } ]; |
This will create an Engage request containing the following JSON document and send it to Engage.
|
1 2 3 4 5 6 7 8 9 |
{ "userID": "EFAB4AA5-76D4-4A2F-BDB0-6142401AD0F6", "decisionPoint": "outOfCredits", "sessionID": "06D4361C-2909-43CD-9728-D316469D64D9", "locale": "en_US", "platform": "IOS_MOBILE", "version": "4", "sdkVersion": "iOS SDK v3.1" } |
Engage will process your request very quickly, typically around 10ms, but the duration of the round trip will be dependent on network latency. Therefore, your game should be structured in such a way that is won’t stall if the user is on a high latency connection.
|
1 2 3 4 5 6 7 8 9 10 11 12 13 |
{ "userID": "F3B04691-626E-40F7-A8D5-C982FB8465D2", "decisionPoint": "outOfCredits", "sessionID": "400589C1-8B65-49C2-B7B2-25CA9D606595", "locale": "en_US", "platform": "IOS_MOBILE", "version": "4", "sdkVersion": "iOS SDK v3.1", "parameters": { "missionName": "Disco Volante", "userLevel": 4 } } |
The engage response contains a transactionID and a parameters object containing any parameters relevant to this player at this point in time.
If the device doesn’t have internet connectivity at the time of the Engage request a cached response from the last successful Engage request for the same decision point will be contained in the response. The isCachedResponse parameter will indicate that this is a cached response.
|
1 2 3 4 5 6 7 8 |
{ "transactionID": 1725229742665236500, "isCachedResponse": true, "parameters": { "creditPackPrice": 99, "creditPackSize": 1 } } |
You may receive a response containing a transactionID but no parameters with personalisation values. This indicates that the player has failed to meet any qualification criteria or has been allocated to a control group.
If there was an error processing your request, Engage will respond with the following error codes.
- 400 – inputs malformed or incorrect in some way, or you are sending real-time parameters that haven’t been added to your Game Parameter list.
- 403 – secret hash key incorrect or Engage is not enabled on your account.
Please check that you have the “On-Demand” package enabled on your Game -> Packages page, you may need to get the Account Owner for your deltaDNA account to do this for you. - 404 – incorrect URL or unknown environmentKey
Please Note: The example code above uses a helper to Log the response from Engage. If you use the stringWithContentsOfDictionary helper method you will need to add the following header to your code.
|
1 |
#import "NSString+Helpers.h" |
Apple Push Notification
The deltaDNA SDK for iOS can store the Apple Push Notification Token for the device and send it to deltaDNA so that you may send push notification messages to players. Your application will be responsible for retrieving (or refreshing) the push token from Apple and storing it in the SDK, thankfully this is very straightforward.
To request a push notification token you will need to add some code to your AppDelegate.m file,
To request the token from Apple and handle both positive and negative responses.
|
1 2 3 4 5 6 7 8 9 10 11 12 13 14 15 16 17 18 |
- (BOOL)application:(UIApplication *)application didFinishLaunchingWithOptions:(NSDictionary *)launchOptions { // Let the device know we want to receive push notifications // Modified to handle changes in iOS8 (this is Xcode 6 code, Xcode 5 you will need to use conditional compiling) if([application respondsToSelector:@selector(registerUserNotificationSettings:)]){ // iOS8 use registerUserNotificationSettings [[UIApplication sharedApplication] registerUserNotificationSettings:[UIUserNotificationSettings settingsForTypes: (UIUserNotificationTypeSound | UIUserNotificationTypeAlert | UIUserNotificationTypeBadge) categories:nil]]; [[UIApplication sharedApplication] registerForRemoteNotifications]; } else { // <iOS 8 use registerForRemoteNotifications [[UIApplication sharedApplication] registerForRemoteNotificationTypes: (UIRemoteNotificationTypeBadge | UIRemoteNotificationTypeSound | UIRemoteNotificationTypeAlert)]; } return YES; } |
|
1 2 3 4 5 6 7 8 |
- (void)application:(UIApplication*)application didRegisterForRemoteNotificationsWithDeviceToken:(NSData*)deviceToken { // Convert the token to a string and strip out spaces and angle brackets. NSString *tokenString = [deviceToken description]; tokenString = [tokenString stringByTrimmingCharactersInSet:[NSCharacterSet characterSetWithCharactersInString:@"<>"]]; tokenString = [tokenString stringByReplacingOccurrencesOfString:@" " withString:@""]; NSLog(@"My token is: %@", tokenString); } |
|
1 2 3 4 |
- (void)application:(UIApplication*)application didFailToRegisterForRemoteNotificationsWithError:(NSError*)error { NSLog(@"Failed to get token, error: %@", error); } |
and to set the push notification token in the SDK. Please note, the pushNotificationToken should be set before the SDK is started.
|
1 2 |
// Set the Push Notification Token sdk.pushNotificationToken = @"740f4707bebcf74f9b7c25d48e3358945f6aa01da5ddb387462c7eaf61bb78ad"; |
The token will then be sent to deltaDNA with each subsequent gameStarted event. Please note if you renew the push notification you will need to call the set PushNotificationToken property to update the stored token.
You will also need to upload your iOS Certificate to the deltaDNA platform in order for Apple to accept push notification requests from deltaDNA, you can do this in the Dashboards >> Targeting >> Manage Identity section of Dashboards. Your certificate from Apple needs to contain both your certificate and key and be saved as a .p12 file.
Check out our Apple Certificate Guide, for more information on how to provision your App to receive Push Notification Messages, create a certificate and save the it in the correct format.
Apple Identifiers
If you wish to record the Apple VendorID or Advertising Identifier parameters from a device you are responsible for retrieving them from the device and sending them as custom parameters with any events you wish to attach them to. You will also need to add these custom parameters in the event management tool.
NB: As of February 2014 Apple have started rejecting Apps that collect the advertising Identifier parameter but don’t display Ads.
Appendix 1 – Class Reference
DDNASDK
|
1 |
DDNASDK *sdk = DDNASDK.sharedInstance; |
Properties
- settings
The settings object lets you modify default SDK settings. Please see the settings reference below for more info. - hashSecret
The hashSecret property should be set if you want your App to use hashing when validating your events.
12// Enable event hashing.sdk.hashSecret = @"RV0cGTsEOsI8GmlGczpSkJAGubg5Qf6B"; - clientVersion
This property should be set by your App in order to differentiate between players using different builds of your game. The SDK will log a warning message if you don’t populate this property.
1sdk.clientVersion = @"1.0"; - pushNotificationToken
This property should be set before starting the SDK if you intend to send push notification messages to the device form the deltaDNA platform. Once set, the pushNotificationToken will be passed to deltaDNA with each gameStarted event. Your app will be responsible for requesting a push notification token from Apple.
12345- (void)application:(UIApplication*)application didRegisterForRemoteNotificationsWithDeviceToken:(NSData*)deviceToken{DDNASDK *sdk = DDNASDK.sharedInstance;sdk.pushNotificationToken = [[NSString alloc] initWithData:deviceToken encoding:NSUTF8StringEncoding];} - environmentKey
This read only property returns the environment key that the SDK is using in communications with deltaDNA. You have two environment keys, a DEV key and a LIVE key. These keys are used to keep your development and testing data separate from your live production data. This property should be provided to the SDK as a parameter in the SDK start method. - collectURL
This read only property returns the URL that the SDK is using to send events to deltaDNA. This property should be provided to the SDK as a parameter in the SDK start method. - engageURL
This read only property returns the URL that the SDK is using to make Engage targeting and A/B testing requests. This property should be provided to the SDK as a parameter in the SDK start method. - userID
This read only property can be used to retrieve the userID from the SDK. The userID will either have been generated automatically by the SDK or provided by the client app when the SDK was started. - sessionID
This read only property returns the sessionID the SDK is currently using. The SDK generates a new sessionID each time it is started. - platform
This read only property returns the platform the game is being played on. This is automatically populated by the SDK. - isInitialised
This read only property returns a Boolean value indicating if the SDK has been initialised.
Methods
- start
Starts the deltaDNA SDK. Requires three mandatory paramaters (environmentID, collectURL, engageURL) that can be found on your game details page on the deltaDNA portal, please see the image below. The fourth, optional, userID parameter will be used if you provide it. If you don’t provide a userID the SDK will generate a unique anonymous userID for you and use it on all subsequent events.
The parameters you need to provide in the start method can be found on your game deatils page in the deltaDNA portal.12345// Start the SDK.[sdk startWithEnvironmentKey:@"<Your DEV or LIVE Environment Key"collectURL:@"<Your Collect URL>"engageURL:@"<Your Engage URL>"userID:@"Your UserID"];

- recordEvent
The recordEvent method creates a JSON event and stores it locally on the device. The SDK will upload all stored events at regular intervals or when the upload method is called. The recordEvent method expects you to provide an eventName and you can optionally provide additional parameters. The event schema for each event your game supports can be viewed and edited in the Event Management tool on deltaDNA. Rigorous validation is carried out on your events to prevent any errors corrupting your production data, you should refer to the schema for each of your events and use the QA tools when instrumenting your game.Each event you record will contain a bunch of parameters. An event is just a JSON object, you can attach these parameters to an event as an NSDictionary or you can use a deltaDNA EventBuilder helper object. There are overloaded triggerEvent methods for each.
1[sdk recordEvent:@"transaction" withEventBuilder:eventParams];1[sdk recordEvent:@"missionStarted" withEventDictionary:eventParams]; - requestEngagement
The requestEngament method is used when you make a request to Engage to see if there are any A/B Tests or targeted campaign that would modify the game’s default behaviour for this player.
The method expects you provide a decisionPoint parameter and a callback method. You can optionally pass real-time game state parameters in the EngageParams object.
123456[sdk requestEngagement:@"outOfCredits"withEngageParams:engageParamscallbackBlock:^(NSDictionary * response) {NSLog(@"Engage returned '%@'.",[NSString stringWithContentsOfDictionary:response]);} ]; - upload
The SDK will automatically upload any locally stored events at regular 1 minute intervals. If you wish to override this behaviour you can use the upload method to send events at a time of your choosing. You may wish to do this if your App is very resource intensive and you wish to send events when there is a lull in the action.
1[sdk upload]; - clearPersistentData
Clears all locally stored data including userID, pushNotificationToken, clientVersion and any events that haven’t yet been been uploaded from the client.
1[sdk clearPersistentData ];
DDNASettings
The settings object can be used to modify settings that control automated SDK features and communications.
- onFirstRunSendNewPlayerEvent
The SDK will automatically send a newPlayer event the first time it is run. Defaults to true. Set this to false if you want to override this behaviour and trigger your own newPlayer event with additional parameters. - onStartSendClientDeviceEvent
The SDK will automatically send a clientDevice event each time your app is launched. The parameters within the clientDevice event are automatically populated by the SDK. Defaults to true. Set this to false if you want to override this behaviour and trigger your own clientDevice event with additional parameters. - onStartSendGameStartedEvent
The SDK will automatically send a gameStarted event each time the app is launched. Defaults to true. Set this to false if you want to override this behaviour and trigger your own gameStarted event with additional parameters. - httpRequestRetryDelaySeconds
The number of seconds the SDK should wait between failed upload attempts. Defaults to 2 seconds. - httpRequestMaxTries
The number of retries that should be attempted for a failed upload attempt. Defaults to 5. - httpRequestTimeoutSeconds
The number of seconds the SDK should wait before timing out an upload request. Defaults to 20 seconds. - backgroundEventUpload
The SDK will automatically upload events at regular intervals if this property is set to true. Defaults to true. Set this property to false if you wish to control the timing of upload requests yourself. You may wish to do this if yor game is particularly resource intensive and you wish to limit your uploads to periods when the game isn’t in a time critical section, e.g. on gameStart, in menus or after missions have been completed. If you are controlling the upload yourself please be aware that any events not uploaded in the current session will be uploaded in the next game play session when you call the upload method, however, if the player doesn’t play the game for a long time the events will be very out of date by the time they are uploaded and will be rejected by the event validator as a result. - backgroundEventUploadStartDelaySeconds
The delay in seconds after the SDK is started until it attempts to upload events. Defaults to 0 seconds to ensure that any events stored from previous sessions are uploaded immediately. - backgroundEventUploadRepeatRateSeconds
The number of seconds between automated event upload attempts.
DDNAEventBuilder
The EventBuilder helps you create structured events.
|
1 2 3 4 5 6 |
DDNAEventBuilder * eventParams = [[DDNAEventBuilder alloc ]init]; [eventParams setString:@"Mission 01" forKey:@"missionName"]; [eventParams setString:@"M001" forKey:@"missionID"]; [eventParams setBoolean:NO forKey:@"isTutorial"]; [eventParams setString:@"EASY" forKey:@"missionDifficulty"]; |
- init
Initialises the Event Builder object. - dictionary
Returns an NSDictionary of the Event Builder object. - setString
Sets a string type parameter with provided key and value - setInteger
Sets an integer type parameter with provided key and value - setBoolean
Sets a boolean type parameter with provided key and value - setTimestamp
Sets a timestamp type parameter with provided key and value - setEventBuilder
Sets an EventBuilder type object with provided key and value - setProductBuilder
Sets a Product Builder type object with provided key and value
DDNAProductBuilder
The Product Builder provides you with methods to help you build product objects as used in transactions and events that contain rewards.
|
1 2 3 4 5 6 7 8 9 10 11 12 13 14 15 16 17 18 19 20 21 22 |
DDNAEventBuilder * evParams = [[DDNAEventBuilder alloc ]init]; [evParams setString:@"Mission 99" forKey:@"missionName"]; [evParams setString:@"M099" forKey:@"missionID"]; [evParams setBoolean:NO forKey:@"isTutorial"]; [evParams setString:@"HARD" forKey:@"missionDifficulty"]; // Create Reward Products DDNAProductBuilder * rewardProductParams = [[DDNAProductBuilder alloc] init]; [rewardProductParams setRealCurrency:@"USD" withAmount:499]; [rewardProductParams addVirtualCurrency:@"GRIND" withAmount:20 andName:@"Gems"]; [rewardProductParams addItem:@"Trophy" withAmount:1 andName:@"Golden Trophy of Awesomeness"]; // Create Reward DDNAEventBuilder * rewardParams = [[DDNAEventBuilder alloc] init]; [rewardParams setProductBuilder:rewardProductParams forKey:@"rewardProducts"]; [rewardParams setString:@"Medal" forKey:@"rewardName"]; // Add Reward to Event Parameters [evParams setEventBuilder:rewardParams forKey:@"reward"]; // Trigger the event [sdk triggerEvent:@"missionCompleted" withEventBuilder: evParams]; |
- init
Initialises the Product Builder object - dictionary
Returns an NSDictionary representation of the Products - setRealCurrency
Adds a Real Currency object to the product
NB: A product builder can only contain one Real Currency Object. The RealCurrencyType should be an ISO 4217 3 character currency code. The currency amount should be an integer of the smallest currency unit. Therefore the following code snippet equates to $4.99 USD
1[rewardProductParams setRealCurrency:@"USD" withAmount:499]; - addVirtualCurrency
Adds a virtual currency item to the product builder. You can add multiple virtual currencies to a product builder, they will be placed in an array of VirtualCurrencies. - addItem
Adds an item to the product builder. You can add multiple items to ta product builder, they will be placed in an array of items.

