
The deltaDNA platform lets you send push notification messages to users.
This topic explains how to enable push notifications for Android devices.
Prerequisites
- Your game is set up to receive events on the deltaDNA platform
- You have integrated the deltaDNA Unity SDK into your application
- *If you are an existing firebase user and have any version of firebase integrated please refer to the below:
- Google recommends having a separate project for different firebase integrations. More information can be found here
- Although you may already have a firebase project please proceed with the steps below in creating a new one.
- Use the new firebase project for DeltaDNA push notifications leaving your old firebase project for existing firebase integrations.
Enabling push notifications for Android
- Create a Firebase account https://firebase.google.com/.
- In the Firebase console https://console.firebase.google.com/, add a new project.
- In the Project Overview, select Project settings. In the Project settings, you can find:
-
- the App ID (in the General tab)
- the Sender ID and the Server key (in the Cloud Messaging tab)
- the Project ID (in the General tab)
- the Web API key (in the General tab)
- the Server key (in the Cloud Messaging tab)
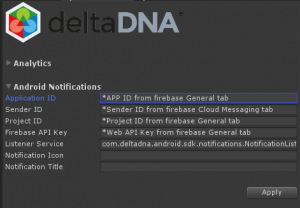
- In the Unity Editor menu, select deltaDNA > Configure to open the deltaDNA Configuration window.
- Go to the Android Notifications section.
- In the Application ID field, enter the App ID from Firebase.
- In the Sender ID field, enter the Sender ID from Firebase.
- In the Project ID field, enter the Project ID from Firebase.
- In the Firebase API key, enter the Web API key from Firebase.
- Click Apply.
- In the script file where you’ve implemented the ‘StartSDK’ method, enter this line of code after your ‘StartSDK’ method:
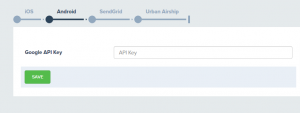
DDNA.Instance.AndroidNotifications.RegisterForPushNotifications(); - In the DeltaDNA platform, go to Setup > Manage Identity.
- Click the Android tab.
- In the Google API Key field, enter the Server Key from Firebase.
- Click Save.
- Build an Android target for your application.
- Deploy the build to your Android device.
The event browser now displays the notificationServices event.
Once the Google Registration ID has connected to the userID, check that push notifications are working successfully.
Testing push notifications
To check if push notifications are working correctly:
- Go to Setup > Message Test Tool.
- Set the Notification type to Android.
- In the Google Registration ID field, select the Lookup button.
- Enter the userID. This automatically brings up the Google Registration ID.
- In the Message Body field, enter a message to send to the device.
- Select Submit.
If notifications are correctly set up, you will receive a notification with the message you entered previously.
Continue below if you would like to setup an out of game campaign
Create an out of game campaign

