
1) Download the latest SDK from deltaDNA Unity SDK documentation page.
2) Import the SDK into your Unity project as a new custom package by selecting the Assets -> Import Package -> Custom Package menu option in Unity and selecting the SDK file you downloaded in the previous step. Import all the files from the SDK package when prompted.
3) A deltaDNA Example scene and scripts will have been added to your project as well as the SDK code. Navigate to the DeltaDNA \ Example folder in the Unity Project Browser if you want to review the example scene and any of the code used in it. The example folder and files can be removed if you do not require them.
4) In order to start sending events from your game to deltaDNA you need to start the SDK with some initialisation parameters that will identify which game the data is originating from. These initialisation details can be found on your “Game Details” page on deltaDNA. Copy and Paste the Dev & Live environment keys and the Collect and Engage URLs into the DeltaDNA -> Configure panel in the Unity Editor, apply your changes then save and re-load your Unity project.
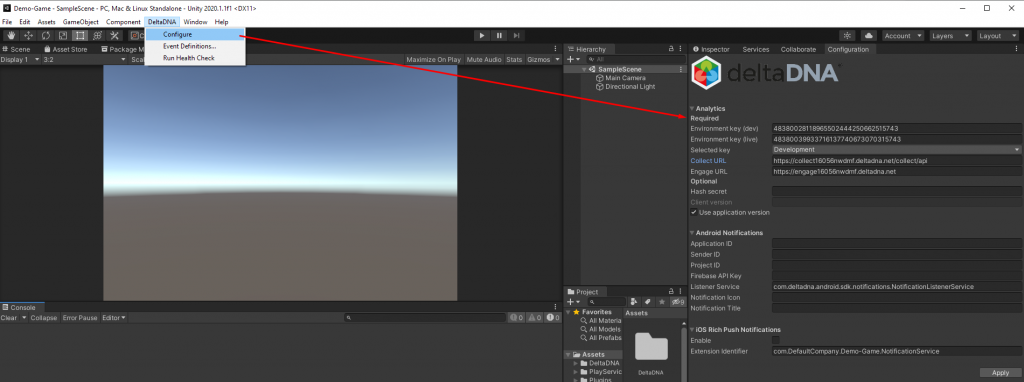
You are now nearly ready to start up the SDK and send some events.
For the purposes of this tutorial.
- Create a new Empty Game Object in your scene
- Add a new C# script to the new Game Object
- Open the script and paste in the following code.
123456789101112using System.Collections;using System.Collections.Generic;using UnityEngine;using DeltaDNA;public class example : MonoBehaviour{// Start is called before the first frame updatevoid Start(){DDNA.Instance.StartSDK();}} - Add the following line before the
StartSDK() method to turn on console debugging if you want to see what the SDK is doing in your Unity Console.
12// Enter additional configuration hereDDNA.Instance.Settings.DebugMode = true;
Now when you Run your game it will start the deltaDNA SDK and automatically send the first simple events.
- newPlayer. This event is recorded the first time the game is launched, after installation.
- gameStarted. This event is recorded every time the game is launched. It is used to track player sessions and the version of the game the player is playing.
- clientDevice. This event is also recorded every time the game is launched. It is used to track the type of device the player is using.
These 3 events are recorded automatically by the SDK. It is possible to disable this automatic behaviour in order to extend the events with additional custom parameters and record them manually yourself. If you want to do this you would disable the following settings before starting the SDK.
|
1 2 3 4 |
// Disable automatic events if extending them with custom parameters. DDNA.Instance.Settings.OnFirstRunSendNewPlayerEvent = false; DDNA.Instance.Settings.OnInitSendGameStartedEvent = false; DDNA.Instance.Settings.OnInitSendClientDeviceEvent = false; |
Your first three, automatic events, will be uploaded to deltaDNA immediately when the SDK is started. The SDK will attempt to upload subsequent events that you record in your code at regular 1 minute intervals. The automatic upload behaviour and it’s frequency can be overridden if you prefer to control the timing them yourself. Check out the DDNA.Instance.Settings BackgroundEventUpload... properties for more information.
As well as the automated events, you can record your own custom events or standard templated events at any time in your game and they will be cached locally until you call events the DDNA.Instance.Upload(); method, or the automated event uploader runs. Use the DDNA.Instance.RecordEvent() method to record events and set their parameters.
|
1 2 3 4 5 |
GameEvent eventParams = new GameEvent("options") .AddParam("option", "sword") .AddParam("action", "sell"); DDNA.Instance.RecordEvent(eventParams).Run(); |
There are also some useful helper methods to help you build the more complex data structures found in rewards and transactions.
|
1 2 3 4 5 6 7 8 9 10 11 12 13 14 15 16 |
GameEvent lv = new GameEvent("levelUp") .AddParam("userLevel", 12) .AddParam("userXP", 240) .AddParam("reward", new Params() .AddParam("rewardName", "Level 12 Reward") .AddParam("rewardProducts", new Product() .AddVirtualCurrency("Gold", "PREMIUM", 100) .AddItem("Golden Battle Axe", "Weapon", 1))) .AddParam("levelUpName", "Level 12") .AddParam("goldBalance", 5100) .AddParam("manaBalance", 4) .AddParam("mapsOwned", 7) .AddParam("userSkill", 4) .AddParam("userTitle", "COMMON"); DDNA.Instance.RecordEvent(lv).Run(); |
Your events will be uploaded to deltaDNA as an HTTP POST containing an array of events in a JSON document in the POST body.
|
1 2 3 4 5 6 7 8 9 10 11 12 13 14 15 16 17 18 19 20 21 22 23 24 25 26 27 28 29 30 31 32 33 34 35 36 37 38 39 40 41 42 43 |
{ "eventList": [ { "eventName": "newPlayer", "userID": "2b55f708-5b37-4af3-b894-5d1eea3baecb", "sessionID": "8f8ed92e-6c58-4b45-beb7-5c3aa70f346d", "eventTimestamp": "2015-09-01 16:17:54.295", "eventParams": { "platform": "PC_CLIENT", "sdkVersion": "Unity SDK v3.6.1" } }, { "eventName": "gameStarted", "userID": "2b55f708-5b37-4af3-b894-5d1eea3baecb", "sessionID": "8f8ed92e-6c58-4b45-beb7-5c3aa70f346d", "eventTimestamp": "2015-09-01 16:17:54.309", "eventParams": { "clientVersion": "1.0.0", "userLocale": "en_ZZ", "platform": "PC_CLIENT", "sdkVersion": "Unity SDK v3.6.1" } }, { "eventName": "clientDevice", "userID": "2b55f708-5b37-4af3-b894-5d1eea3baecb", "sessionID": "8f8ed92e-6c58-4b45-beb7-5c3aa70f346d", "eventTimestamp": "2015-09-01 16:17:54.318", "eventParams": { "deviceName": "AMD Athlon(tm) II X4 630 Processor (4096 MB)", "deviceType": "PC", "hardwareVersion": "AMD Athlon(tm) II X4 630 Processor (4096 MB)", "operatingSystem": "WINDOWS", "operatingSystemVersion": "8.1", "timezoneOffset": "+01", "userLanguage": "en", "platform": "PC_CLIENT", "sdkVersion": "Unity SDK v3.6.1" } } ] } |
You can use the “Event Browser” tool in the SETUP menu to check your most recent valid and invalid events, inspect the data and review any error reports. This will help you identify and fix any errors before publishing your event schema to the LIVE environment. deltaDNA undertakes strict event validation on your events to prevent your data from getting corrupted. Approximately 10 standard events, used to populate the standard Measure dashboards, are added to the event schema when your game is added to deltaDNA. If you wish to extend these events with more parameters or add new events you should use the Event Management tool to specify the event schema and the Event Browser to test your events before publishing them to the LIVE environment.
Finally, when you have implemented all your events and confirmed that they are working correctly you should publish them to the LIVE environment using the publish button in the Event Manager in your DEV environment. You can then change the environmentID in your SDK startup code to the LIVE environmentID and submit your game to the App store.
Please note: It is important that you only send live production traffic to your LIVE environment and development and QA data to your DEV environment. There are unique environment keys for each environment on your “Game Details” page that should be used in your SDK Start method to determine which environment your events should be directed to.

